This is the multi-page printable view of this section. Click here to print.
My Blog
- Reach Engine + Media2Cloud (AWS: This is my architecture)
- Configure Amazon Inspector using Cloudformation
- Visual Studio Code Tips and Tricks
- Useful Docker Commands/Tips
- How to easily check the version of a globally installed npm package
- How to easily configure a Route53 domain for use with Office 365
- Building a Chatbot using the Microsoft Bot Framework
- The all-in-one ALM Solution
- Welcome
Reach Engine + Media2Cloud (AWS: This is my architecture)
This fall I had the opportunity to shoot an episode of AWS’s This is my architecture where I got to talk about how Reach Engine integrates with Media2Cloud. Checkout the episode in the link below.

Configure Amazon Inspector using Cloudformation
What is Amazon Inspector?
Amazon Inspector is an AWS service which analyzes EC2 instances for known vulnerabilities and other issues.
There are 4 predefined rule packages, my template opts to use all of them:
- Common Vulnerabilities and Exposures
- Center for Internet Security Benchmarks
- Network Reachability
- Security Best Practices
To take full advantage of Amazon Inspector you will also want to be sure to install Amazon Inspector agents, this post does not cover that.
How can I use Cloudformation to deploy and configure Amazon Inspector?
If you dont care about whats going on inside, no need to read any further simply deploy this template out of my s3 bucket: https://beverts-templates.s3-us-west-2.amazonaws.com/inspector.yml. It will configure inspector to run once a day against the configured targets using all 4 rule packages. It takes 4 parameters:
- TagKey - tag key to match ec2 instances on
- TagValue - tag value to match ec2 instances on
- ResourceNamePrefix - used in naming of created resources
- SubscriptionEmailAddress - email address to send scan findings to
It is very straightforward to write a template that deploys the all the Inspector and SNS components that will be used to define the scan parameters and sns topic/subscription. The problem is that (at time of writing) AWS::Inspector::AssessmentTemplate does not have parameters for configuring the run schedule or the notification topic (although these is easily achieved in the UI).
In order to resolve this we will make 2 lambdas:
- InspectorConfigureFunction - This uses the inspector api to configure notifications to an SNS topic created by the template. This lambda will be invoked by this custom function when the template is deployed in order to configure the subscription
- InspectorRunFunction - This uses the inspector api to kick off a scan, it will be invoked once daily by this event rule

These are the inspector resources which get deployed:
- InspectorTarget - holds the group
- InspectorGroup - this is what is used to group the ec2 instances. All instances that have the tag key/value specified in the parameters will be added to the group
- InspectorTemplate - this is the main inspector resource that gets created, it ties together the group and the rule packages.
These are the SNS resources which get deployed:
- InspectorTopic - SNS topic for scan findings to be posted to
- InspectorSubscription - Subscribes to the topic, the email address passed in as a parameter will automatically be subscribed to the topic
My tagging strategy is complex, this template wont satisfy my needs
No problem! This template can be easily extended to support a specific tag combination. First create another parameter like TagKey and another parameter like TagValue. You could name them TagKey2 and TagValue2
Then add references to your new parameters in the ResourceGroupTags array just like the entry that is already there.
Upload the new template to your bucket and you should be good to go!
I want to make this part of my deploy
Nested stacks are a great strategy for keeping your templates modular and this template can be easily be included (one or more times) as a nested stack. Nested stacks can be achieved by using the AWS::CloudFormation::Stack resource type.
Visual Studio Code Tips and Tricks
Visual Studio Code is a powerful and extensible IDE. It is the only IDE I use, here are a few tips to help optimize your VS Code experience.
Debugging
One of the best things about VS Code is that with the help of a few extensions it can debug almost any language. Debugging is configured through the .vscode/launch.json. Below are some examples of what it takes to debug different languages in VS Code.
C Sharp
- launch.json
- Required Extension: ms-vscode.csharp
Java
Java debugging (and support) is provided through a combination of Red Hat and Microsoft extensions.
VS Code needs to use Java 8 for debugging and intelisense to work, this doesnt mean that the project needs to be Java 8, just VS code needs to be configured to use Java 8.
The provided launch.json assumes the debugger is listening on localhost:5005, this can be updated by modifying the hostName and port properties of the debug configuration.
For tests, the provided launch.json assumes localhost:5555, to expose this port during a test run appened these args to your run tests command -Dmaven.surefire.debug="-Xdebug -Xrunjdwp:transport=dt_socket,server=y,suspend=y,address=5555 -Xnoagent -Djava.compiler=NONE".
- launch.json
- Required Extension: vscjava.vscode-java-pack
Go
- launch.json
- Required Extension: lukehoban.go
Node
Node debugging is supported natively by VS Code.
Web Apps
Modern web apps require different debug configurations depending on how the source is transpiled (or if it even is transpiled).
The key value to configure when trying to debug a web app is webRoot key. This directory should contain the main entry point to the web app.
~The jest plugin claims to support debugging but I have yet to get that aspect of the extension to work (still an awesome extension tho). If that works for you great, if not you can just use the node debugger that comes with vscode by default.~
For webpack debugging it is important that your webpack config includes:
    devtool: 'source-map',
    output: {
        publicPath: '/',
        ...
    },
    ...
- Required Extension for Chrome: msjsdiag.debugger-for-chrome
- Required Extension for Firefox: hbenl.vscode-firefox-debug
- Generic web app Launch.json
- Webpack compiled Launch.json
- Jest Launch.json
Extensions
A lot of Visual Studio Code’s power comes from it’s extensability. The community is extremely active and new extensions are available on the marketplace every day.
You can add reccomended extensions to a project by adding a .vscode/extensions.json file to it.
Below are a few recommended extensions.
Language Support
Miscellaneous
- Code Runner - This extension allows you to execute the opened file (supports a variety of languages).
- Editor Config - Provides editorconfig support
- Status Bar Tasks - This extension allows tasks defined in tasks.json to become buttons on the bottom bar of your IDE. This extensions is badass
- TODO Highlighter - Highlightes TODO’s in comments
- Live Share - Tool for collaborative coding
Git
- Git Lens - Provides a bunch of awesome git features. This extensions is badass
- Git History - Provides a good visualizer for git history
Icons / Themes
- Linux Themes - I am a huge fan of the Monokai Dimmed theme provided by this extension
- Icons
- Great Icons
Javascript / Typescript
- Chrome Debugger - Support for debugging in chrome
- Document This - Helps generated JSDocs
- ESLint - ESLint highlighting and autofixing
- Import Cost - Shows the size of imports inline
- Jest - Provides Jest Support. This extensions is badass
- Path Intellisense - Provides path intelisense on imports
- TSLint - TSLint highlighting and autofixing
Snippets
- thekalinga.bootstrap4-vscode - Font Awesome
- johnpapa.Angular2 - Angular (2+)
Keyboard Shortcuts
Settings
User Settings are configured by modifying the settings.json for your workspace or your machine. You can view/edit both by hitting cmd + ` from within vs code.
You can find an example settings.json here
Monospaced Programming Fonts with Ligatures
Monospaced programming fonts and ligatures are both supported by Visual Studio code and make reading code easier.
Note: To use ligatures you must use a font that supports them.
A good font that supports monospacing and ligatures is monoid. To use monoid in vscode with ligatures, first download and install it from here. Then add these 2 properties to your settings.json:
"editor.fontLigatures": true,
"editor.fontFamily": "Monoid"
To read about other fonts that support ligatures and monospacing checkout Scott Hanslemen’s write up here.
Snippets
A snippet is when you type an alias that represents something and then hit enter to expand it, for example in vscode by default you can type while hit enter, and then it will expand to say:
while (condition) {

}
in your file, eliminating you having to type a few things. In this case it only buys you 4 characters and a new line, but snippets can provide alot larger chunks of code than that.
You can read more about how to create your own snippets here.
Useful Docker Commands/Tips
TL:DR Skip to the bottom, copy and paste snippet into your .bash_profile.
Here are a handful of tips and commands I have compiled from my time working with docker.
Tips
Targeting Containers, Images, etc When interacting with the docker api (via the cli or any other means), you only need to use the unique piece of the id for what you are targeting. That is to say if these are my containers:
CONTAINER ID        IMAGE               COMMAND                  CREATED             STATUS              PORTS               NAMES
3c273e91180b        postgres            "docker-entrypoint..."   5 seconds ago       Up 4 seconds        5432/tcp            wonderful_jones
a11b6b51aeed        postgres            "docker-entrypoint..."   5 seconds ago       Up 4 seconds        5432/tcp            gifted_hamilton
I could use the command docker logs 3 to show me the logs from the first container (since my second container id starts with a and I only have 2 containers)
Chaining Commands
I have seen lots of crazy grep/awk commands in order to grab bits of information from the docker cli output. Docker provides some flags across many popular commands so that this is completely unnecessary.
-q/--quiet- This can be used to force the output of your command to only output ids, this means we can use this flag to get an output in a format ready to pipe into another command. Works on: images, ps, network ls, volume ls, and more-f/--filter- This can be used to apply a filter on the output of the command to return a subset of the items that would otherwise be output Using the -q and -f flags we can chain most docker commands together in readable fashion.
Useful Commands
Warning: I swing a heavy hammer with my docker environments since they are meant to be ephemeral, if you don’t want to lose things in your environment be careful with these commands.
Kill all containers
docker kill -f $(docker ps -aqf status=running) - This can be read as “Forcefully kill (docker kill -f) all running containers (docker ps -aqf status=running)”. This command will kill all running containers without prompting.
What is the difference between stop and kill?
stop will try to shutdown nicely by sending the shutdown signal to the container while kill will forcibly shutdown all containers without waiting for a graceful exit.
Remove all exited containers
docker rm -f $(docker ps -aqf status=exited) - This can be read as “Forcefully remove (docker rm -f) all exited containers (docker ps -aqf status=exited)”. This command will remove all exited containers without prompting.
Remove all images
docker rmi -f $(docker images -q) - This can be read as “Forecfully remove (docker rmi -) all images”. This command will try to remove all images without prompt. If any images have containers (in any state), those containers will need to be removed before the images can be removed.
Remove all of other things
You can use the pattern shown above to cleanup networks, volumes, services, and/or whatever other docker modules you use.
Open a shell session into a container
docker exec -it CONTAINER_ID sh - This can be read as “Execute the command sh in the container with the id CONTAINER_ID in interactive mode. Often times I hear someone say “how can I ssh into a container?”, this isn’t using the ssh protocol, but it is effectively the same thing.
Note: If you want to use bash you can replace sh with bash, keep in mind that not all images will have bash installed (alpine for instance does not come with bash by default).
Aliases
You can pop this in your ~/.bash_profile to get easy access to the operations described above:
# kill all running containers
alias dkill='docker kill $(docker ps -aqf status=running)'
# remove all exited containers
alias drm='docker rm -f $(docker ps -aqf status=exited)'
# kill and remove all containers
alias drmf='dkill && drm'
# remove all images
alias drmi='docker rmi -f $(docker images -q)'
# open a shell session into container - `dsh SOMEID`
dsh() {
  docker exec -it ${1} sh
}
How to easily check the version of a globally installed npm package
Why
When opening an issue on github, it is important to provide all the relevant information to your bug, one of those things being the version of the package you are having trouble with. We wanted to provide users of the swellaby yeoman generator an easy way to retrieve the version of their generator so I made a small utility to help with that, which can be used on any globally installed package.
How
Assuming you have node & npm installed (how else would you have a globally installed npm package), here are the steps:
- Install my utility npm install -g get-pkg-version.
- Use it get-pkg-version
- You can test it out with the package itself get-pkg-version get-pkg-version.
You can check out the source code here.
How to easily configure a Route53 domain for use with Office 365
As an avid user of both O365 and Route53, I am frequently configuring new domains on O365. I quickly got frustrated with the experience so I whipped up a little script to make my life easier. To make the the lives of others easier, I recently wrapped it up in my aws-mgmt-utils package as a bin.
Prerequisites:
- A domain in a hosted zone on Route53
- An active O365 Subscription (you can start a trial if you dont have one)
- The aws-cli is installed and configured on your machine
- Node.js & npm
Steps
- In a terminal, install my utils - npm install -g aws-mgmt-utils (you may need to be admin)
- In a browser go to the O365 Admin Page and click Add a Domain
- Enter your domain and click next
- Copy the TXT Value field (it should look something like MS=ms38863110)
- In a terminal create/update your TXT record - r53-update-record ${your_domain} TXT ${value_from_4}
- In the browser click Verify (you may need to wait a few minutes while DNS propagates)
- In a terminal update all your other records - r53-o365 ${your_domain}
- Back in the browser you should now be able to click through the rest of the prompts (again, you may need to wait a few minutes for DNS)
Hope this helps! If you want to check out my node aws utilities further or request new features you can do that on github here.
Building a Chatbot using the Microsoft Bot Framework
Intro
Most younger people (myself included) don’’t like to talk to companies on the phone and will do almost anything to avoid going somewhere in person to resolve an issue. The first place I will go to try and accomplish something would be a companies website or app (depending on the nature of what I am trying to accomplish), if I can’’t accomplish it via those means, online chat is my next avenue. This is where the chatbot comes in, most conversations can be handled using an automated system, better yet the user doesn’’t even need to know they are chatting with a bot. Depending on the number of users who engage you over chat and the quality of your bot, you could save a ton of time and money with a chatbot.
The purpose of the post is to show you how to create a simple bot using a simple and scalable approach. The Microsoft Bot Framework provides us with a common programming model with which we can connect to a number of different channels as well as an easy way to integrate with LUIS, a cognitive service from Microsoft that provides language understanding capabilities.
Build your bot
Prerequisites
You will need to install a few things to get started:
- Node - I would use a newer version
- yeoman -
npm install -g yo - swellaby typescript generator -
npm install -g generator-swell - Bot Channel Emulator* - Not required and only available for windows
- You will also want a good text editor, I recommend VS Code but you can use whatever you want.
If you don’’t have a Microsoft account you will want to create one. You will use this to create an app on LUIS and to register your bot on the bot registry.
Create and Review Project Structure
First you will need to generate the scaffolding for your project. To do this open a command prompt and run yo swell, answer the the type prompt with New Chatbot and enter y when asked if you would like to install dependencies.
After this if you navigate into your newly created directory (which will have the name you gave the generator for your app), you should notice the following files/folders:
- build - This folder contains the gulp tasks & configuration
- package.json - App info, dependencies, script
- src - Holds app files
- test - Holds test files
- tsconfig.json - Typescript Configuration
- tslint.json - Typescript Lint Settings
- You will notice a few other files as well
To make the dev loop easier we have provided the a number of npm scripts in the scaffolding. These are the important ones:
npm run build- This transpiles the typescript into javascriptnpm run test- This runs the unit tests and generates a coverage reportnpm run clean- This removes the.jsand.js.mapfiles
Lets take a dive into src, where our chatbot really lives:
- bot.ts - This is main class. The purpose of this class is to configure the bot. It sets defaults, registers dialogs to paths, and binds intents to paths. The class provided by the scaffolding assumes that you are planning on using LUIS for your intent engine.
- config.ts - This file is used for configuration of the app.
- console.ts - This script starts the bot for interaction over the console. This would only happen in dev scenarios.
- server.ts - This script starts the bot for interaction using a web server. The scaffolding chooses restify (which is very similar to express).
- dialogs - This folder is where the dialogs will go.
- dialogs/dialog-base.ts - All dialogs will inherit from this class, it provides the base property and method that we we use to bind dialogs to paths.
- dialogs/sample.ts - This is an extremely simple dialog that tells the chatter what their favorite food is.
Run the sample bot
Before we modify the bot to do something new, let’’s test out what is provided by the scaffolding over the console.
- Transpile the code -
npm run build - Start the bot on the console -
node src/console.js - Using natural language tell the bot what your favorite food is (i.e. “My favorite food is ice cream” or “I love apples”)
One of Three different thing will probably happen:
- Ideal Case - The bot (more specifically LUIS), will recognize that you were trying to tell it what your favorite food was, and what that food was and respond back to you with that (i.e “Your favorite food is ice cream”)
- Another possibility is that LUIS new you were trying to tell it what your favorite food was but could not identify what it was, the bot will respond with “What is your favorite food?”, looking for a direct answer to that question, and will the respond telling you what your favorite food is
- Worst Case - LUIS doesn’’t understand what you are talking about and the bot will respond to you telling you that
While this is a pretty simple scenario , lets talk about what is happening in the first 2 cases. Your text is sent of to LUIS (a model I trained), when LUIS determines that you are talking about your favorite food this is determining intent.
On line 52 of bot.ts you will see:
this.dialog.matches(''favoriteFood'',config.dialogs.paths.sample);
This line is binding the favoriteFood intent (which is definied in LUIS), to a path defined in our config file.
On line 46 of bot.ts you will see:
(new SampleDialog()).register(this.bot,config.dialogs.paths.sample);
Here we are binding our SampleDialog to that same path. This is how we get into the dialog defined in our dialogs/sample.ts.
The dialog really starts on line 11 of the SampleDialog class. This is the method into which the program will flow when the favoriteFood intent is returned from LUIS. The first thing we try to do is retrieve an entity (in this case the favorite food) from the information returned by LUIS. Entities must be defined in LUIS, in some cases an entity will not be passed by the user and other times the entity will be passed but not detected by LUIS. We attempt this in this block of code:
session.userData.food = builder.EntityRecognizer.findEntity(args.entities, ''food'');
Later in the dialog we check to see if we actually found the entity, and if we did we (lines 15-18) set the value appropriately and move to the next function (ideal case). If we failed to detect the entity we prompt the user for it (lines 13-15).
Intent and Entities are important LUIS concepts, read more about them in the official docs.
Create your own intents & dialog
The first thing we will want to do is create a new LUIS app and update our config.ts to reference it.
- Go to https://luis.ai
- Sign In/Up
- Click “Create New App” and fill out the form
- Navigate to your app and click “App Settings” to retrieve your ID and Key
- Replace my ID and Key on lines 36-37 of your
config.tswith the ones you retrieved from LUIS
You can add intents and entities to LUIS, as well as train it using the web UI. Remember to publish your updated model after training it! You will want to refer to the LUIS docs (linked above) for details on how to do this, however the UI is pretty straightforward.
After we have created the intent in LUIS, we will want to create a dialog to handle that intent. For your first dialog, I would rename the file src/dialogs/sample.ts to something that reflects the purpose of that dialog. Modify the class name and export from Sample to the name of your dialog. After that you will want to write your actual dialog by replacing the setting of the dialog object (starting on line 10). There are a variety of ways to write your dialog, take a look at the documentation here.
Each intent created on LUIS will need to be tied to a dialog so that we can handle the conversation in our code. To do this we will need to do the following in bot.ts:
- Import the dialog (replace line 3 for the first one)
import SampleDialog = require(''./dialogs/sample'');
- Bind your dialog to a path (replace line 45 for the first one), your path should be defined in your
config.ts
(new SampleDialog()).register(this.bot, config.dialogs.paths.sample);
- Then bind your intent to the same path (replace line 49 for your first one)
this.dialog.matches(''favoriteFood'', config.dialogs.paths.sample);
Additional notes about building on the scaffolding
A few general notes about building on the scaffolding.
- In the real world you will probably have some additional classes to connect to services, I would recommend creating a folder under
srcnameddata-accessto hold these classes - Manage your listen port in
config.ts - I elected to put dialog strings in
config.ts, as your bot grows you may want to move these out into a separate config file. You could also put the strings in line but the feels wrong to me. - This server listens on
http, to register your bot on the framework you need anhttpsendpoint with a trusted cert, an easy way to do this is put your bot behind a proxy using AWS API gateway
Chatting with your bot on popular channels
The Microsoft Bot Framework makes it easy to engage chatters on a variety of channels using the same code base. It also provides a layer of abstraction between your chatbot application and the channels you engage your users with.
Most of the available channels are self explanatory with the exception of two:
- Web Chat - The bot framework will provide you with an url that you can put in an iframe and embed the chatbot on your website
- Direct Line - This provides an API with which you can engage your bot.
To give you an idea of how difficult it is to configure a channel lets look at the skype configuration.
First you would click edit on the Skype Channel of the Bot Management UI.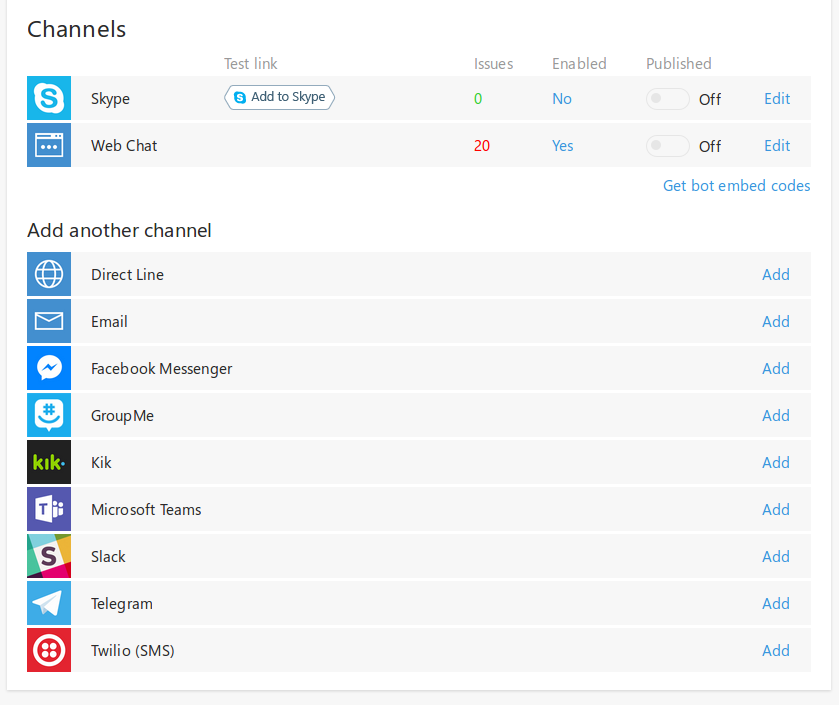
Then you simply fillout this form:
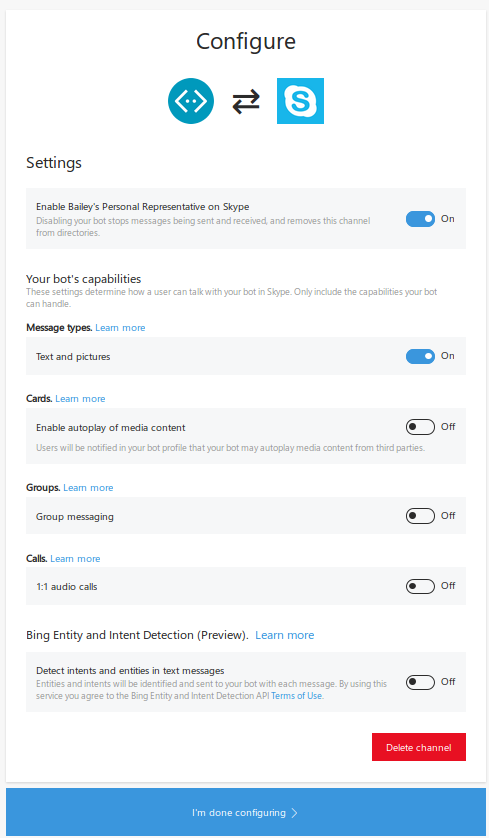
Pretty straightforward right!?!
Conclusion
The Microsoft Bot Framework provides a good programming model and an easy method to integrate with a number of different channels. LUIS provides an approachable interface with which people who are not necessarily “data scientists” to develop and leverage a model for processing and understanding natural language.
Hopefully now you have an idea how you can build a chatbot and connect it to channels so you can start engaging users in new ways. Soon I will make a post showing how to debug the chatbot using Visual Studio Code.
The all-in-one ALM Solution
The Problem
Many large enterprises still insist on running their Application Lifecycle Management (ALM) tools in house, they pour a ton of resources into what often ends up being a large suite of a mismanaged tools that loosely integrate with each other. This becomes a pain point for developers and the usage of these tools turns almost ceremonial in nature and leads to things like high developer turnover. Furthermore the mismanagement of these tools can make them nearly unusable.
In this world, even if developers are disciplined enough (and able) to use the tools properly, it is extremely difficult to sees a connection between a developer checkin, a build, a test case, a version, a deployment, approval(s), and/or whatever steps happen as part of your ALM process. Often many, if not all of these steps happen in different tools, not only does this make it difficult to get an end to end picture in the event of a problem or audit, but it requires developers to change context numerous times (which slows them down).
What is Visual Studio Team Services (VSTS)?
VSTS is a SaaS ALM tool (ALMaaS if you will) from Microsoft. Team Foundation Service is the on-premise equivalent. It has modules for version control, build, release, package, test case, and project management. With all of these capabilities in one tool traceability is easy. We can look at a release and see exactly what feature(s) are being released, what build(s) produced those artifacts, and the commits that triggered those builds. VSTS has easy to configure dashboards that allow its users to see all of the information that is important to them relative to the project on one screen.

Here is a breakdown of the different tabs (from left to right in the image above):
- Home - This tab is made up of easily customized dashboards to view information about your project.
- Code - In this tab you can view browse your repositories and commit history. Supports Git and TFSVC.
- Work - In this tab you can manage your work items. Supports Agile, CMMI, and Scrum. The templates are extremely customizable.
- Build & Release - In this tab you can create/manage your builds, releases, artifacts, and packages. The build & release systems are heavily customizable. Currently the only package types supported are NuGet and NPM.
- Test - In this tab you can create/manage Test Cases & Plans as well as Load Tests
- Arcade Hub - Microsoft has even added games to VSTS. Note: You must install Galactic Dodge for this tab to appear
- Settings - From here we can manage project level settings. There is a different section for account management
Each one of these tabs encapsulate capabilities that are often provided by at least one tool, with VSTS all of these capabilities are provided by one tool. The deep integration provided by this makes it possible to setup Continuous Integration and Delivery flows with just a few clicks.
But I don’’t use C#/Windows/Azure?
Under Satya Nadella Microsoft has made monumental changes towards embracing Linux and Open Source. VSTS is no exception to that trend, it works with any language, on any platform, on any cloud. Out of the box you get access to free hosted build agents on Linux and Windows (personally I use exclusively Linux agents). It supports Android, iOS, Ant, Gradle, Grunt, Gulp, Maven, NPM, Xamarin and more without installing any extensions.
If you doubt the validity of this or simply want to see how a language/tech could be supported feel free to comment below.
Integrations & Extensibility
VSTS has a plethora of integrations available out of the box and even more are available through the marketplace. Here are a few highlights:
- Github- You can use VSTS to trigger builds from Github repositories.
- Docker - Execute docker commands, secure docker host management, registry credential management.
- Apple App Store & Google Play Store - Enabling CD to the app stores.
- Teams, Slack, & HipChat - For ChatOps.
- PowerBI - PowerBI is an extremely powerful, easy to use, free analytics tool from Microsoft. It can reveal a variety of information based off data collected from your Project.
- Jenkins - While I am not a huge fan of Jenkins and I certainly wouldn’’t recommend it over the VSTS build system, the fact is some people love Jenkins, and many people already have a lot of Jenkins jobs. You could use this integration as a stepping stone in your migration to full blown VSTS.
If you cant find an extension for what you need it isn’’t all that difficult to build one yourself. Microsoft provides 2 SDK’’s:
- VSTS Task Lib - This can be used for extending the build system. Very easy to use (see my samples here). Available for Node.Js and Powershell. I will post a tutorial on this soon.
- VSS Web Extension SDK - This allows for more advanced extensions (i.e modifying the gui).
Currently a friend and I are working on a yeoman generator to assist with creating these (and a variety of other typescript projects). Check it out on github. I will do a full write up on it when we make our first release.
Plugins are available for many popular IDE’’s:
- Eclipse
- IntelliJ
- Android Studio
- Visual Studio
- Visual Studio Code
You can also integrate with Visual Studio Team Services via its RESTful API or via Client Libraries for popular programming languages.
Pricing
VSTS is very competitively priced, see the details here. I use VSTS extensively for my personal projects and I don’’t pay anything at all. At the time of writing this is what you get for free:
- VSTS is free for projects of 5 or less people.
- Unlimited Private Git Repos
- 1 Private Agent Slot (unlimited minutes)*
- 1 Hosted Agent Slot (with 240 minutes/month)*
- 20,000 virtual user minutes/month for load testing
*1 slot means 1 agent running a build/release at a time, not 1 agent running at a time
Code
Here is some of my VSTS related code on Github:
The Future
To see what features are currently being developed (or what has been released) you can view the VSTS Feature Timeline, easily one of my favorite places on the Internet.
I will post some tutorials and/or more in depth looks at pieces of VSTS sometime soon! If there is anything specific you would like to see please comment below.
Welcome
My name is Bailey and I love technology. I am always working to stay up to date with the latest software and hardware.
Professional Life (and beliefs)
I am a Full Stack (Software) Engineer at a large financial services company. In the last few years I have designed, built, tested, and deployed a variety of mobile and web apps. I am passionate about distributed computing and developer productivity. I am comfortable working with linux and windows. I have extensive experience with the major public cloud providers and docker. I am a polygot developer capable of delivering solutions using a variety of programming languages and technologies. I am a strong believer in DevOps principles and agile methodologies.
Personal Life
I was born in California and grew up in Texas and Alberta (Canada). In December 2013, I received a B.S in Computer Science From Texas Tech University. In the Fall of 2015 I married my wonderful wife Ryan Alyssa Everts. I have 2 cats, 1 dog, and 2 fish tanks. My primary hobby is “technology”, I always have multiple hardware/software projects in progress and am always reading/learning about emerging technologies. My other hobbies include rocks, aquariums, and snow boarding.